Tunnels: Connect your localhost with the rest of your teammates and the world


Introduction
In the world of software development, it is not uncommon to need to share our applications running locally with our team members or with clients. The process of sharing a locally running application with the rest of the world can be a challenge due to the various networking configurations and security protocols that exist. Connecting your local host with the rest of your team and the world is essential because it allows you to test your application on multiple devices and platforms. Moreover, it enables you to showcase your work to others and get feedback, which is crucial for improving the application's quality.
/One of the tools that can help developers to connect their local host with the rest of the world is Tunnels.
What is Tunnels?
Tunnels is an Onboardbase tool that allows developers to share their locally running web applications with the rest of their team members or the world without having to deal with complex networking configurations or firewall settings. With Tunnels, you can securely expose a web application running on your local machine to the internet through a secure HTTPS connection.
Real-World Scenarios
Let's explore some real-world scenarios where Tunnel can be beneficial:
Collaborating with team members: When working on a team, it is important to share progress and updates with other members. Tunnels make it easy to share a locally running application with other team members, no matter where they are located. This can help to speed up development and improve collaboration among team members.
Testing with clients: When working with clients, it is often necessary to share a working version of an application. Tunnels can be used to securely share a web application with clients, allowing them to test and provide feedback on the application before it goes live.
Demonstrating an application: When presenting an application to a potential client or investor, it is important to have a working version of the application available. Tunnels can be used to quickly and securely share a web application with others, making it easy to demonstrate the features and functionality of the application.
Comparison with other tools:
There are several tools available that allow developers to share locally running web applications with others. Let's compare Tunnels with some of these tools:
Ngrok: Ngrok is a tool that provides secure tunnels to localhost. While Ngrok is a great tool, it is limited in terms of the number of connections that can be made at any given time. Tunnel, on the other hand, has no such limitations, making it ideal for larger teams.
LocalTunnel: LocalTunnel is a tool that allows developers to expose their local host to the internet. However, LocalTunnel requires an open port, which can be a security risk. Tunnel, on the other hand, uses secure HTTPS connections, making it more secure.
Pagekite: Pagekite is a tool that provides a public address for a local server. While Pagekite is a great tool, it can be difficult to set up and configure. Tunnel, on the other hand, is easy to set up and use.
Serveo: Serveo is a tool that enables developers to create a secure tunnel between their local host and the public internet. However, Serveo is not as reliable as Tunnel, and it often fails to create a secure tunnel between the local host and the public internet.
Getting started with Tunnels
Check out this guide for real-world use of Tunnels!
Getting started with Tunnels is relatively easy.
To create a tunnel using Tunnels, you need to follow the below steps:
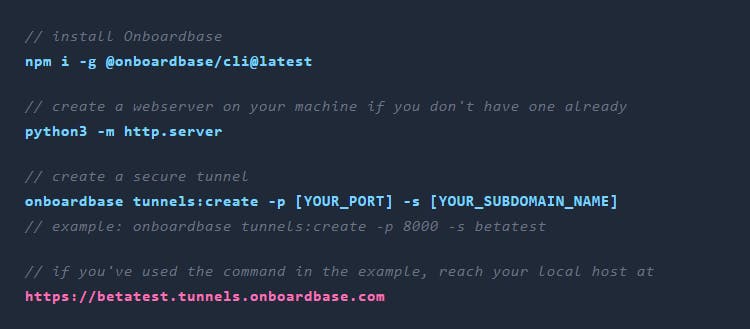
First, you need to ensure that you have a web server running on your machine. If you don't have one running, you can use this command to set one up.
python3 -m http.server
Step 1: Installing Tunnels
The first step is to install Tunnels. You can install Tunnels by running the following command:
npm install -g @onboardbase/tunnel
Step 2: Create a tunnel
The second step is to create a tunnel. You can create a tunnel by running the following command:
onboardbase tunnels:create -p [PORT] -s [SUBDOMAIN_NAME]
Here, you need to replace [PORT] with the port number of your web server and [SUBDOMAIN_NAME] with the name of the subdomain you want to use for the public URL.
For example, if you want to create a tunnel for port 8000 and use the subdomain name subDomain, you can run the following command:
onboardbase tunnels:create -p 8000 -s subDomain
This command will create a tunnel between your local host and the public internet, and the public URL will be subDomain.tunnels.onboardbase.com.
Tunnels provide several options that allow developers to customize their tunnels and make them more secure and accessible. These options include:
-p, --port: An open localhost port on the host machine
-o, --open: If you would love to open the live URL in a browser.
-s, --subdomain: The name of the subdomain to use for the public URL. e.g -s base would give you base.[tunnels.onboardbase.com]
Step 3: Share the public URL
The third step is to share the public URL with your teammates or clients. They can use this URL to access your local development environment and provide feedback.
Conclusion:
In conclusion, Tunnels is an excellent tool for developers who want to connect their local host with the rest of their team and the world.
It is simple, easy to use, and does not require any server configurations or DNS issues. With Tunnels, developers can easily share their local development environment with others and get feedback, which is crucial for improving the quality of the application.
Overall, Tunnels is a must-have tool for any developer who wants to improve their local development workflow and collaborate with others effectively.
Try Tunnels!
Check out more products at Onboardbase!